Master Hand Violin Shop
Store Hours
Owner
Elizabeth Ecklund
Elizabeth Ecklund
What do you do if you've just purchased a new (and exciting!) set of strings for your instrument? If you answered that you immediately take off all your old strings and then put the new strings on, you are incorrect. This will lead to your bridge falling off and possibly even your soundpost falling over. No, there is actually skill involved in changing strings. But don't worry; you can acquire the string-changing skill!
When changing strings, it is important to remember that some string tension must remain on the violin, viola, cello or bass at all times. If tension is removed, the bridge will fall off, the soundpost could fall, the tailpiece could whack your instrument, and you might have to make a trip out to our shop. Since you probably don't want any or all of the above occuring, you should preserve string tension by always changing your strings one at a time. The first new string should be on and tightened before the next string comes off. If you are changing a whole set of strings, you should change the strings in the order they appear vertically on the scroll, going from bottom to top. Thus, if you have a violin, you should change the G string and next the E, etc; whereas, if you have a viola or cello, you change the C and next the A, etc.
The first order of business, when changing strings, is taking off the old string. This is accomplished by turning the peg towards yourself repeatedly until the string comes off the peg. You may then gently remove the string from the tailpiece.
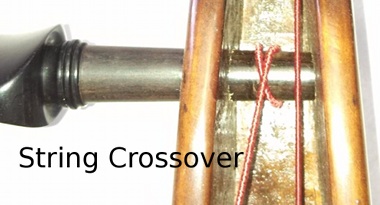
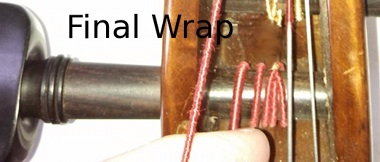
Now it's time to put the new string on! How is this done? First, place the ball of the string in the tailpiece or fine tuner (or around the entirety of the fine tuner if you have a loop). Ensure the string will run over the string grooves in the bridge and nut. Next, the tip of the string should be placed straight through the hole in the peg (as opposed to bringing the string up behind the peg) so that an eighth inch or so of string sticks out through the peg. The peg should then be turned away from you until the string tip is facing you. At this point you must ensure that the string will wrap on the side of the hole that is towards the narrow end of the peg. Wrap this way for one turn. When the end of the string comes back around, the string should be crossed over so that it wraps towards the large end of the peg, and thus you should continue wrapping until the peg is tuned.
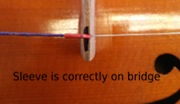
Some strings have sleeves; sleeved strings are typically the thinner, steel strings, such as an E. These can cut into the bridge. If your string has a sleeve on it, the sleeve should fit on the bridge so that none of the sleeve extends beyond the bridge onto the bowing area.

Once all your new strings are on and tightened, you should be ready for them to instantly go out of tune. If you have synthetic or gut strings, you may want to tune your instrument a little high to aid and expedite the string stretching process. Either way, you needn't fret because within a few days your strings should be holding a pitch, and hopefully they will be as much fun to play on as you hoped!
Share on Facebook